Posted on 5 Comments

Pre-Market Gap Scan OVERHAUL!

premarket movers gap scan for thinkorswim

I want to be sure I’m providing a really good value for what I do, and that I respond to feedback from my customers. To that end, I spent a lot of time doing a complete overhaul of the pre-market gap scan set for the Stock Hacker scanner in ThinkOrSwim. To be clear, the old set of scans worked great, and I use modified versions of them all the time.  But I wanted to make the scans even more powerful and full-featured so that they really do the best job they can possibly do. So today I’ve released the new version 2.0 gap scans, and EVERYONE who has purchased the scans in the past gets a free upgrade. You’ll notice the new links in your My Account > Orders > Order Details section automatically. Also, for those that haven’t purchased a copy yet, the scans are on sale this month here.

What’s New with the Pre-Market Gap Scan

First, there are a lot more of them, and all of them are more full-featured and easier to customize. They’re also more consistently setup, with cleaner code and comments.

Second, all the scans are set to find gaps greater than a certain percentage change, and you can now change that percentage to whatever you want for all of the scans!

Third, you’ll notice some new scans in both the pre-market group and the regular hours group. In the pre-market gap scan group, I’ve included a set of scans that finds what I call “insignificant” gaps, or gaps from the close, not from the high or low. Basically just a pre-market mover stock where there’s a gap between yesterday’s closing price and today’s opening price, even if that doesn’t take the open outside of yesterday’s range altogether.

Technically, a gap is any stock that OPENS higher than the previous day’s high, or lower than the previous day’s low. But if you run regular hours scans later in the day, the stocks might not all look like gaps because some of them have already filled the gap (i.e., even though a stock might have opened below yesterday’s low, today’s trading has moved the high so that it is now equal to or higher than the previous day’s low, for example, filling the a gap down). So one or two people got confused when my regular hours scans included these stocks that had later filled their gaps. I explained it to them, but I figured it would be even better to give everyone both options so you can weed out the ones that have already filled the gap, if you want to. So you’ll notice those scans below under “regular hours”.

All Version 2.0 Gap Scans Default to these Settings:

  • Last Price Between $5 – $200
  • Avg. Daily Volume > 500,000
  • Avg. True Range > .5
  • Gap >= 1%

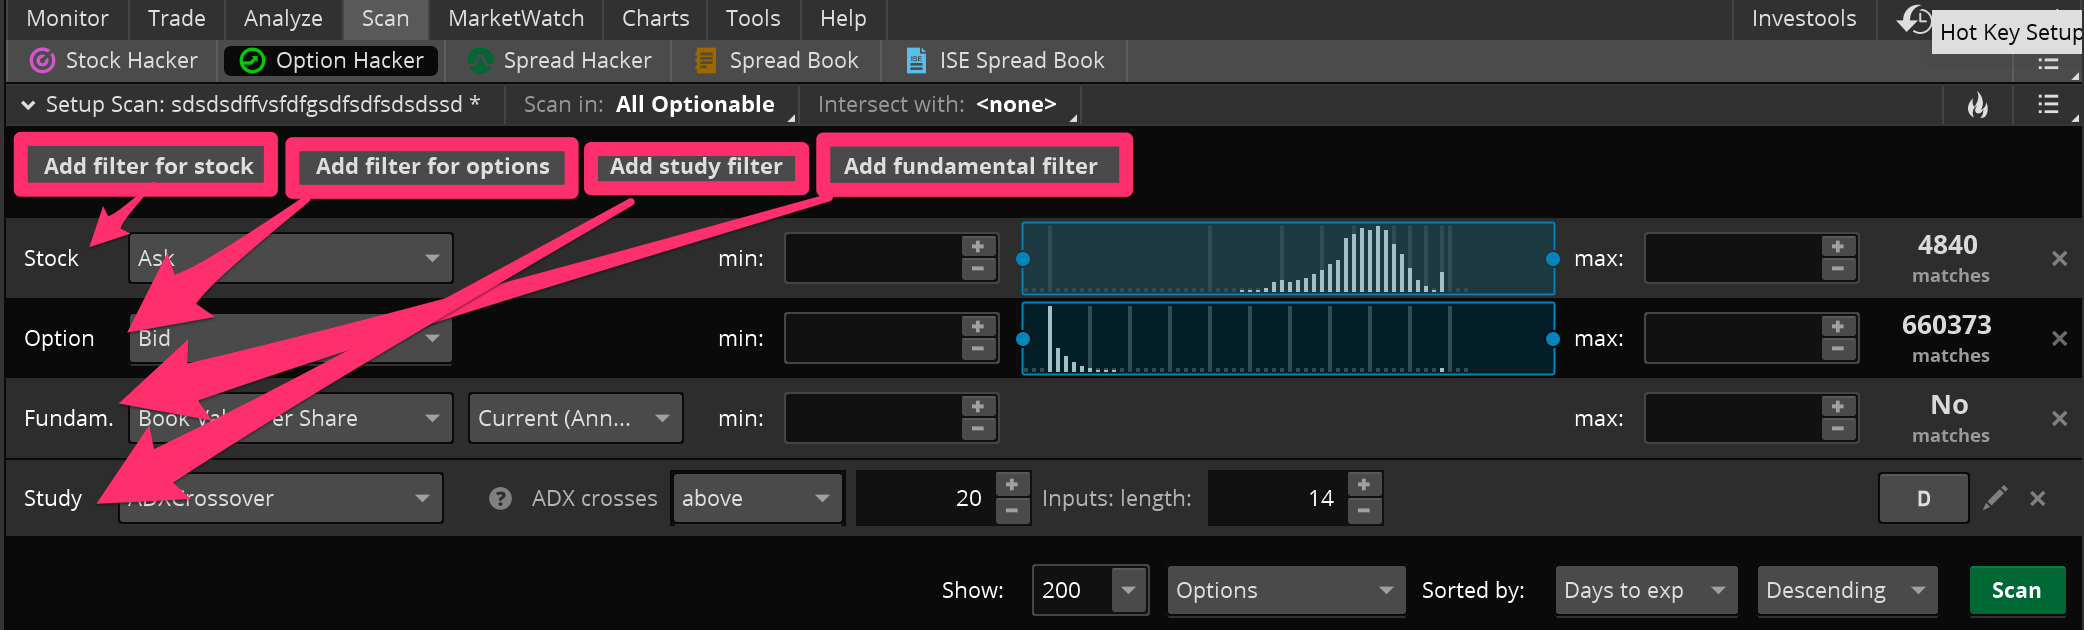
All these settings can be adjusted and my comments inside the scan should help you do that if needed. Just use the drop-downs and input fields, or click the pencil icon next to any filter to change it. If you want to remove a filter altogether just click the X on the right hand side of the StockHacker window for that line of the scan. Be sure to save a new copy with a new name to apply the changes.

PRE-MARKET GAP SCAN – AFTER HOURS / EXTENDED HOURS SCANS

All Significant Gaps > X% From High Or Low
Significant Gaps Up > X% Above High
Significant Gaps Down > X% Below Low

All Tier 1 Significant Gaps > X% from High or Low
Tier 1 Significant Gaps Up > X% above High
Tier 1 Significant Gaps Down > X% below Low

All Gaps from Close (instead of hi/low) > X%
Gaps Down from Close (instead of low) > X%
Gaps Up from Close (instead of high) > X%

REGULAR TRADING HOURS SCANS

Gaps That Haven’t Filled Yet

All Significant Gaps (+ haven’t filled) > X%
Significant Gap Ups (+ haven’t filled) > X%
Significant Gap Downs (+ haven’t filled) > X%

All Tier 1 Gaps (+ haven’t filled) > X%
Tier 1 Gap Downs (+ haven’t filled) > X%
Tier 1 Gap Ups (+ haven’t filled) > X%

Gaps That May or May Not Have Filled

All Significant Gaps > X%
Significant Gap Ups > X%
Significant Gap Downs > X%

All Tier 1 Gaps > X%
Tier 1 Gap Downs > X%
Tier 1 Gap Ups > X%

Definitions

I always refer to gaps in terms of either being insignificant, significant, or tier 1. That’s just how I learned to think about them, but to translate my “trader speak,” here’s a quick definition of each:

  • Insignificant: A gap from the close, where the open has moved > X% from yesterday’s CLOSE, but where the stock may or may not be opening outside of yesterday’s range altogether. These are basically just a good, cleaned up list of pre-market movers, and this is the broadest type of gap scan you can do.
  • Significant: A gap from the high or low, where the open has moved > X% from yesterday’s HIGH or LOW, and thus the stock is opening completely outside of yesterday’s range. These are “true” gaps.
  • Tier 1: A significant gap in the opposite direction of yesterday’s price movement. So if yesterday was a green up bar, today is a significant gap below the low of yesterday. Or if yesterday was a red down bar, then today is a significant gap up over yesterday’s high. Basically the gap is negating all price movement from yesterday and “shocking” traders who wake up and see their positions suddenly in the red. There is a greater likelihood to see some panicked covering of positions at and near the open, and especially at any early retrace toward yesterday’s price where trapped traders will try to get out nearer to break-even.

Low Float Stocks

Just a quick note here: I know a lot of pre-market gap scan users also trade low float stocks. Low float stocks that gap in the morning can often create a real spike in price movement a make a trader a lot of quick profit if they’re on the right side of that price movement. But trading these setups used to be next to impossible to do within ThinkOrSwim, so most people had to pay for a standalone scanning service like Trade Ideas at god-awful subscription rates.

However, recently I came up with a workaround that has been doing well for TOS traders — I’ve painstakingly created 5 custom static lists of stocks, with floats less than 10 million, 20, 30, 40, and 50 million shares float each, and I have posted those for sale over here.

And it gets better. All the gap scans can be set up to run only on the low float lists, thus only returning low float gapping stocks. So now if you purchase both products in the shop area, you can not only scan for normal gaps, but also for the low float gaps so many people are looking for ways to find now.

Improvements

If you have any ideas for improvements to either the pre-market gap scan or the regular hours gap scan, I’m happy to hear them. Also, since this is a big release, I’m sure there might be a bug or two found during the first few weeks, so let me know if you spot anything weird.

CLICK HERE TO GET THE NEW SCANS


Posted on 3 Comments

Tutorial – Scanning with Options Hacker in ThinkOrSwim

thinkorswim tutorial options hacker how to add filters

Scanning with Options Hacker: A ThinkOrSwim Tutorial

I noticed that there is not very much information out there on the Options Hacker scanner for TOS. Because of that, I wanted to do a quick ThinkOrSwim tutorial on Options Hacker and at least note some of the differences between it and Stock Hacker to clear up some of the confusion. This article will explain the basic features of Options Hacker, and the steps to setting up a custom option scan in Think-Or-Swim. It also notes the differences between the Stock Hacker and Options Hacker scanners.

Options Hacker Differences

So why can’t you just use Stock Hacker? Well, you can, and sometimes it may be easier. But Options Hacker is good for keeping the two types of scans separate and keeping your settings the same when switching back and forth between trading and analyzing the two.

In Options Hacker, you will still be filtering down a list of stocks first of all, just like in Stock Hacker. You can use all your normal filters: price, volume, average volume, price performance, etc. You can even add custom study filters here for the underlying stocks. It’s important to note that the study filters only work for the stocks. You can’t currently program any custom studies to use for option filters. You can use the new Fundamental Filters they just recently made available in TOS. These can be very helpful for you value investors and longer-term traders out there.

After you get the stocks narrowed down to only the ones you would be interested in, now it’s time to filter down the stock options. Here you can add any option attribute available: open interest, delta, price, etc.  You can’t currently scan for option bid-ask spread, but with a custom column I made, you can at least sort the results to show the lowest spreads at the top.

Thinkorswim Options Hacker: add filters
Thinkorswim Options Hacker: How to add different types of stock & option filters to your scan.

Saving Your Option Scan

To Save your new options scan, click on the lower menu icon on the top right corner (see gif) and select “Save Scan Query”. Once you’ve given it a name, it will show up in your list of custom scans under the “Personal” section. To load any scan, including this one, simply click the same menu icon and select “Load Scan Query.” Then move your mouse over the Personal section of the menu, which is in alphabetical order, to whatever you named your scan. When you click on the name it will automatically load onto the scanner window below.

Thinkorswim tutorial on Options Hacker - how to save and load a scan
Thinkorswim Tutorial – how to save and load a scan in Options Hacker

Hopefully that helps. One of the most confusing things about Options Hacker is that the Study filters don’t work on options, they only work on stocks. You might think since it’s called Options Hacker, when you scan for the closing price or the ATR, it would be calculating those with the options prices. But that’s just not the case currently. You can only use the built in options filters to filter the options, you have to use the other types of filters for the underlying stocks.

For those of you who are more visual learners, I also made a short video where I show you how to set up a customized option scan in think or swim. In it, I show you step by step how to add stock filters, option filters, and custom study filters for the underlying stock. I show you how to narrow and sort the results, and finally, how to save the scan to use later. You can find the full video at the bottom of this post.


Posted on 2 Comments

How to Install ThinkOrSwim Indicators, Studies, Scans, Columns & Strategies [VIDEO]

Install ThinkOrSwim Indicators

ThinkOrSwim is a great platform, but let’s face it: some things are just plain confusing. Luckily, some of us have already been through the trial and error and know how to do a lot of the stuff you want to know how to do. So in this tutorial, I’ll go through a few of those things. In particular, I’m going to teach you how to install ThinkOrSwim indicators and other thinkScripts.

There are actually 2 methods for installing thinkScripts.

    1. Clicking the sharing links
    2. Copying and pasting the sharing links manually

We’ll go through each on in it’s turn. I’ve also included a video below that will walk you through each and every method except the first one, since it’s pretty easy.

VIDEO TABLE OF CONTENTS:
0:59 How to Install a SCAN
2:01 How to Load a scan in the main StockHacker scanner window after installing it
2:12 How to Load a scan in a sidebar watchlist widget – refreshes automatically every 3 minutes
2:53 How to Install a COLUMN
3:17 How to Load a column on a sidebar watchlist after installing it
3:54 How to change the timeframe of a column
4:07 How to install an INDICATOR or chart study
4:34 How to load an indicator or study onto a chart after installing it
5:09 How to install a STRATEGY file
5:26 How to load a strategy file onto a chart after installing it
5:43 Summary and recap

How to Find Your ThinkOrSwim Import Links

If you’ve just purchased an indicator on our site, all your links will in the My Account section under Orders. First, mouse over the “My Account” menu item at the top right of the page, then click “Orders” in the drop-down menu:

finding your thinkorswim links

On the next page, you’ll see all your orders. Click the one you’re interested in viewing the links for:

thinkorswim orders page

When your order details page pops up, you’ll see your import links below, as well as your file downloads should you want them later:

thinkorswim order details with sharing links

Now that you have your import links, it’s time to go through the actual installation process.

Method 1: Clicking the ThinkOrSwim Sharing Links

This method is pretty easy and straight-forward. Or so you would think anyway. Each ThinkScript can be shared with its own unique “tos.mx” sharing link. Clicking one of these links will take you to a page on ThinkOrSwim’s website where you can confirm what the script is. The page looks like this:

install thinkorswim indicators with sharing links, confirmation page

Then if you approve, you can click the green confirmation button (the one that says “Scan now in thinkorswim”). The file should be automatically imported into your TOS application.

I say should because it doesn’t work on all systems. Specifically those where TOS isn’t installed for all users. For those lucky traders, the green button will ask you to reinstall TOS. But if you don’t want to do that, no problem! You’ll just need to skip to method two below.

Method 2: Copying & Pasting the TOS Sharing Links

If the automatic link method above doesn’t seem to work, don’t fret. Just go into your ThinkOrSwim application, and click the “Setup” menu in the top right corner (gear icon). In the dropdown menu that appears, click “Open shared item”.

install thinkorswim indicators by copying sharing links step 1

Then a box will pop up, and you can simply copy and paste the link into the space that says “Shared item URL”. You have to go through this process one link at a time unfortunately. After you paste in the link, click “Preview”:

install thinkorswim indicators by copying sharing links step 2

The program will load the link into memory and grab the name so you’ll know for sure what you’re importing. If everything looks good, then click “Open”:

install thinkorswim indicators by copying sharing links step 3

A confirmation dialog box will pop up telling you the script has been imported and given a machine-generated name. Click “Rename” to change the name to something that will be easy for you to find in an alphabetical list later:

how to install thinkorswim indicators by copying sharing links step 4

Remember to give it an easy to remember name, but something unique as well:

install thinkorswim indicators by copying sharing links step 5

Voila! You’re done. The script has been imported and saved under your chosen name. See the end of this post for instructions on how to load and use each of the scripts you’ve just imported.

Now that you’ve figured out how to get the code into ThinkOrSwim, it’s time to actually activate the code and start using it. Here’s a brief rundown of how to find and activate thinkScripts that you’ve recently imported into ThinkOrSwim…

How To Load a Chart Study or Indicator

If you were importing a chart study (or indicator), then you just need to go to charts > studies > edit studies, and search for the script name in the list. Then double-click to add it to the chart (or click “Add Selected” below), and then click OK to apply the changes:

add a thinkorswim study or strategy to chart

Keep in mind if you didn’t give the study a name during the import process, it might be in the alphabetical list under “Fs” for “From Easycators on XYZ Date”, so be sure to check the “Fs” if you don’t see the study/indicator after searching.

How To Load a Strategy File

If you were importing a strategy file, then you’ll still go to the Charts > Studies > Edit Studies window, but instead of searching in the normal list of studies, you’ll switch to the “Strategies” tab on the top left corner of the Edit Studies window, and then search in that list for the strategy file:

thinkorswim strategies

Again, keep in mind if you didn’t give it a name during the import process, it might be in the alphabetical list under “Fs” for “From Easycators on XYZ Date”, so be sure to check the “Fs” if you don’t see the strategy after searching.

How To Load a StockHacker Scan

If the link you just imported was a scan, a window will pop up with the scanner rules ready-to-go. Just click scan and watch it work. You might have to resize and expand the window to see the results. Or you can close that popup and load the scan in your main window as well. You can access your scans at any time from the dark gray menu on the top right:

how to load a thinkorswim stockhacker scan query

Keep in mind if you didn’t give the Scan a name during the import process, it might be in the alphabetical list under “Fs” for “From Easycators on XYZ Date”, so be sure to check the “Fs” if you don’t see the scan after searching.

How to Load a Custom Quote or Watchlist Column

If you just imported a column thinkScript, there are a couple of ways to activate and use it. You can use columns in the MarketWatch Quotes tab, or in the StockHacker or OptionsHacker scan tabs, or on a sidebar watchlist on the left hand side of the window. In either case, you’ll first right-click anywhere on the column headers and select “Customize…”

add a watchlist quote column step 1

A window pops open with a list of columns you can add. Just find the column name in the alphabetical list, and double-click to add it to the right hand side. Then click OK:

add a watchlist quote column step 2

The column will now appear on your quote screen (whichever column header you had originally right-clicked on):

add a watchlist quote column step 3

Keep in mind if you didn’t give the Column a name during the import process, it might be in the alphabetical list under “Fs” for “From Easycators on XYZ Date”, so be sure to check the “Fs” if you don’t see the column after searching.

Conclusion

That should just about do it. Now you should have all your scans, strategies, columns, and studies/indicators imported and installed. Not only that, but if you went through the second part of the tutorial, you should have the thinkScripts added to your screens and ready to roll.

If you find you’re still unsure of how to do something, check out my video. I walk through almost all of these methods on the screen for you, and it should help you figure out anything you missed:

If you have any questions or issues, please post a comment below!