These tutorials will teach you how to use Thinkorswim in your trading. Tutorials for metrics, map analyses, premium trading tactics, and watchlist columns can all be found here.
Scanning with Options Hacker: A ThinkOrSwim Tutorial
I noticed that there is not very much information out there on the Options Hacker scanner for TOS. Because of that, I wanted to do a quick ThinkOrSwim tutorial on Options Hacker and at least note some of the differences between it and Stock Hacker to clear up some of the confusion. This article will explain the basic features of Options Hacker, and the steps to setting up a custom option scan in Think-Or-Swim. It also notes the differences between the Stock Hacker and Options Hacker scanners.
Options Hacker Differences
So why can’t you just use Stock Hacker? Well, you can, and sometimes it may be easier. But Options Hacker is good for keeping the two types of scans separate and keeping your settings the same when switching back and forth between trading and analyzing the two.
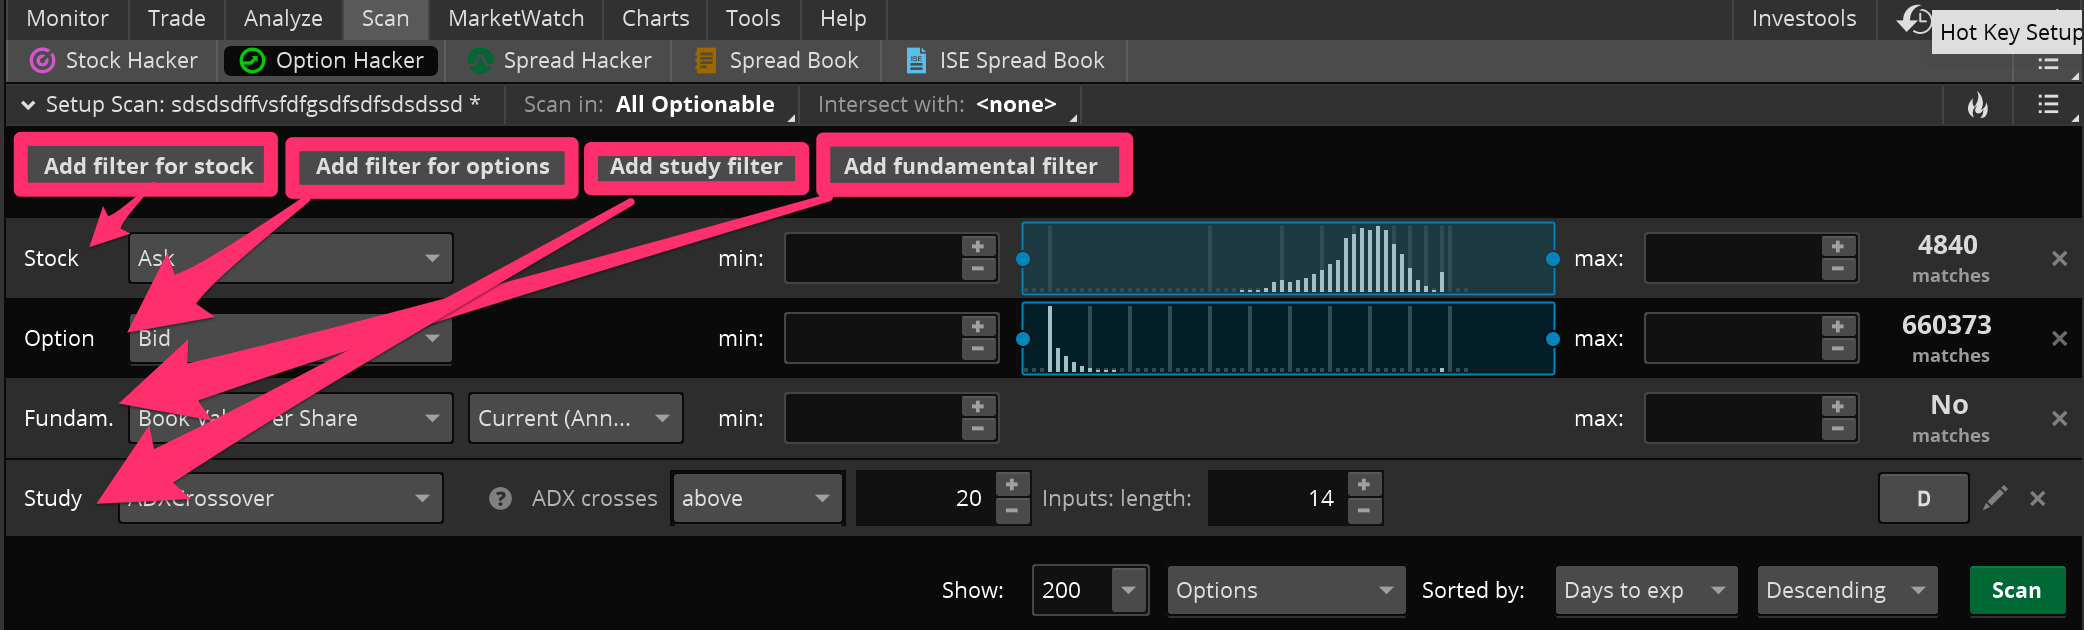
In Options Hacker, you will still be filtering down a list of stocks first of all, just like in Stock Hacker. You can use all your normal filters: price, volume, average volume, price performance, etc. You can even add custom study filters here for the underlying stocks. It’s important to note that the study filters only work for the stocks. You can’t currently program any custom studies to use for option filters. You can use the new Fundamental Filters they just recently made available in TOS. These can be very helpful for you value investors and longer-term traders out there.
After you get the stocks narrowed down to only the ones you would be interested in, now it’s time to filter down the stock options. Here you can add any option attribute available: open interest, delta, price, etc. You can’t currently scan for option bid-ask spread, but with a custom column I made, you can at least sort the results to show the lowest spreads at the top.
Thinkorswim Options Hacker: How to add different types of stock & option filters to your scan.
Saving Your Option Scan
To Save your new options scan, click on the lower menu icon on the top right corner (see gif) and select “Save Scan Query”. Once you’ve given it a name, it will show up in your list of custom scans under the “Personal” section. To load any scan, including this one, simply click the same menu icon and select “Load Scan Query.” Then move your mouse over the Personal section of the menu, which is in alphabetical order, to whatever you named your scan. When you click on the name it will automatically load onto the scanner window below.
Thinkorswim Tutorial – how to save and load a scan in Options Hacker
Hopefully that helps. One of the most confusing things about Options Hacker is that the Study filters don’t work on options, they only work on stocks. You might think since it’s called Options Hacker, when you scan for the closing price or the ATR, it would be calculating those with the options prices. But that’s just not the case currently. You can only use the built in options filters to filter the options, you have to use the other types of filters for the underlying stocks.
For those of you who are more visual learners, I also made a short video where I show you how to set up a customized option scan in think or swim. In it, I show you step by step how to add stock filters, option filters, and custom study filters for the underlying stock. I show you how to narrow and sort the results, and finally, how to save the scan to use later. You can find the full video at the bottom of this post.
This article tells you exactly how to find your way around the ThinkOrSwim login screen. If you’re new to TD Ameritrade’s think or swim platform, read on for more information on getting started and logging in to trade.
Get the Program
The first thing you need to know is how to get ahold of the program itself. Just go to our thinkorswim download page if you don’t have the application installed yet, and download thinkorswim. Launch the installed and go through the prompts, making sure you install for all users. Once you’re done, click OK and the program should launch on its own.
The Thinkorswim LogIn Screen
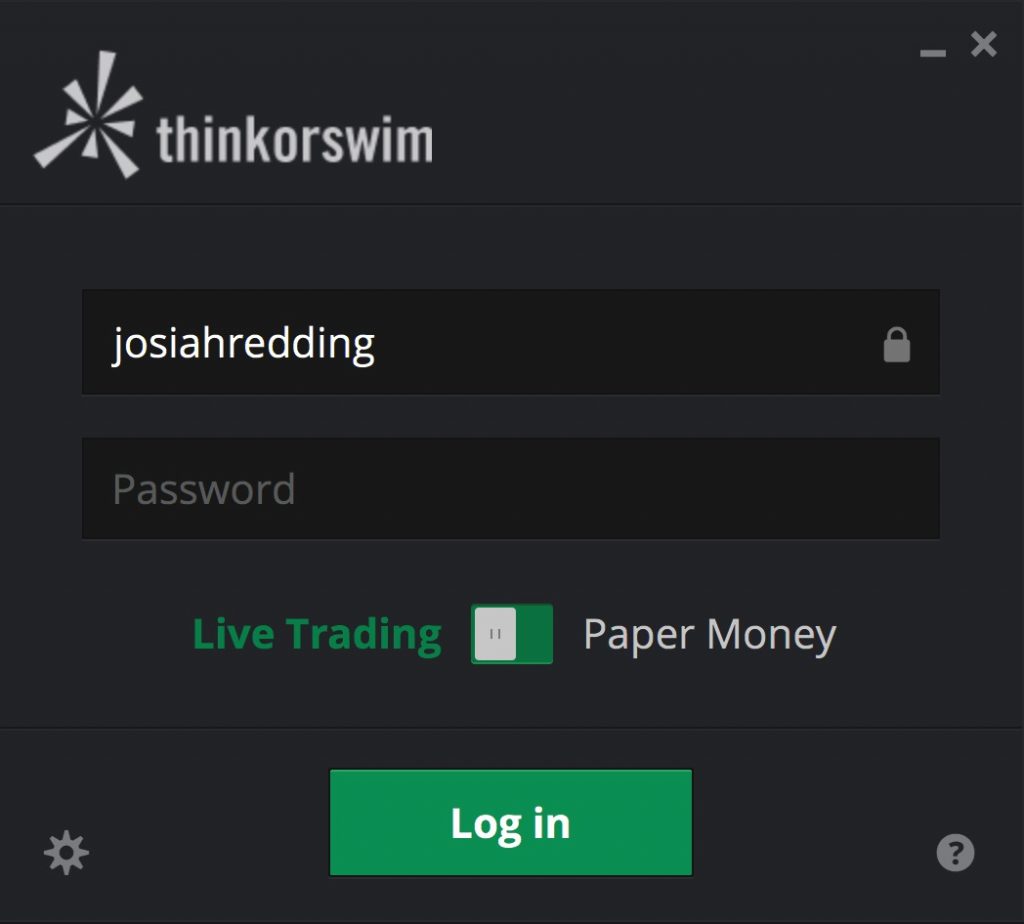
Once you have the program, locate it on your hard drive and double-click the icon to open it. It will show a “Checking for updates…” progress bar for a few moments. This is where the application calls home to TDA and makes sure there are no updates to be installed. If there are, it will install them and relaunch. If there aren’t, it will take you to the login screen:
The Thinkorswim login screen has your typical username and password fields. But there are also a few other options here to discuss:
Lock Icon
Once you type in your username, you can click the “lock” icon in the field. This saves your user ID so that next time you launch the program you won’t have to type it in again. It basically saves you some time and effort each day.
Question Mark Icon
The question mark icon is there just in case you run into any technical difficulties on startup. Basically it just gives you the toll free 800 number to call in case of technical issues to get customer support.
Thinkorswim Login Options
The login options will be displayed once you click on the gear icon on the lower left side of the login window. It will bring up a window that looks like this:
thinkorswim log in options
Look and Feel
Here you have some options you can set before launching the platform. First, you have the color theme. Most people use the dark them, and that’s the one I prefer as well. It’s a little easier on the eyes after staring at your screen for several hours, in my opinion. But you can select a light them or whatever other options you prefer.
Next you have the font size. If you have a small monitor then you might want to choose the smaller font size to be able to squeeze more onto your screen. If you can’t read small text very well, on the other hand, you may need to set the font to be larger.
After that you have a space for a proxy server address in case you need to connect through a specific server. Most people can simply ignore this.
Memory
In the next two fields you can specify a minimum and maximum memory allotment for the platform. This basically tells TOS to go ahead and block out a certain amount of RAM on your computer to be used just for this program. It comes with some default settings, but if things are running slow, you might want to bump up the minimum and maximum settings. The platform will actually alert you later if you start running low on memory anyway.
Backups
If you ever mess something up or make a change in the software that you don’t like, don’t worry. The platform automatically backs itself up, and you can always rollback to a prior version. Or if you have a version saved externally from a different computer, you can always load that one as well. Just click the clock icon and select the date of the backup you want. If you want to choose a backup saved somewhere other than the application’s main folder, select the last option in the menu and browse to find the file.
After you have all your options chosen and set how you like them, click Save to go back to the main Thinkorswim Login window. From there you can finish typing in your password, choose either Live Trading or PaperMoney simulated trading, and then click Log In.
Home Screen Shows up after Thinkorswim Login
Once the think-or-swim log-in process is complete and the platform finishes loading, if this is your first launch, you may notice a popup called the “home screen”. This is ThinkOrSwim’s news and updates screen, featuring recent blog posts and streaming CNBC. You can close this out by clicking the X at the top right. And you can always re-open it by clicking Home Screen in the top right corner of the platform.
I personally find the home screen popup to be annoying, and a lot of other people do to. But if you happen to be one of those people, you’re in luck. You can turn off the home screen popup very easily. Just click Setup in the top right corner, and select Application Settings. In the window that appears, click on Startup, and then uncheck the box that tells it to open the home screen on every startup. Accept the changes and you’re all set. Next time you launch the platform the popup won’t launch automatically.
Conclusion
Hopefully this gives you a good comprehensive overview of logging in to ThinkOrSwim. If you have any questions feel free to leave a comment below. Incidentally, if you’ve forgotten your password or username, you can always go to the thinkorswim login help page and TD Ameritrade will get you set up.
And here’s a full video on the TOS log in screen in case we missed anything in the tutorial above.
ThinkOrSwim is a great platform, but let’s face it: some things are just plain confusing. Luckily, some of us have already been through the trial and error and know how to do a lot of the stuff you want to know how to do. So in this tutorial, I’ll go through a few of those things. In particular, I’m going to teach you how to install ThinkOrSwim indicators and other thinkScripts.
There are actually 2 methods for installing thinkScripts.
We’ll go through each on in it’s turn. I’ve also included a video below that will walk you through each and every method except the first one, since it’s pretty easy.
VIDEO TABLE OF CONTENTS:
0:59 How to Install a SCAN
2:01 How to Load a scan in the main StockHacker scanner window after installing it
2:12 How to Load a scan in a sidebar watchlist widget – refreshes automatically every 3 minutes
2:53 How to Install a COLUMN
3:17 How to Load a column on a sidebar watchlist after installing it
3:54 How to change the timeframe of a column
4:07 How to install an INDICATOR or chart study
4:34 How to load an indicator or study onto a chart after installing it
5:09 How to install a STRATEGY file
5:26 How to load a strategy file onto a chart after installing it
5:43 Summary and recap
If you’ve just purchased an indicator on our site, all your links will in the My Account section under Orders. First, mouse over the “My Account” menu item at the top right of the page, then click “Orders” in the drop-down menu:
On the next page, you’ll see all your orders. Click the one you’re interested in viewing the links for:
When your order details page pops up, you’ll see your import links below, as well as your file downloads should you want them later:
Now that you have your import links, it’s time to go through the actual installation process.
This method is pretty easy and straight-forward. Or so you would think anyway. Each ThinkScript can be shared with its own unique “tos.mx” sharing link. Clicking one of these links will take you to a page on ThinkOrSwim’s website where you can confirm what the script is. The page looks like this:
Then if you approve, you can click the green confirmation button (the one that says “Scan now in thinkorswim”). The file should be automatically imported into your TOS application.
I say should because it doesn’t work on all systems. Specifically those where TOS isn’t installed for all users. For those lucky traders, the green button will ask you to reinstall TOS. But if you don’t want to do that, no problem! You’ll just need to skip to method two below.
If the automatic link method above doesn’t seem to work, don’t fret. Just go into your ThinkOrSwim application, and click the “Setup” menu in the top right corner (gear icon). In the dropdown menu that appears, click “Open shared item”.
Then a box will pop up, and you can simply copy and paste the link into the space that says “Shared item URL”. You have to go through this process one link at a time unfortunately. After you paste in the link, click “Preview”:
The program will load the link into memory and grab the name so you’ll know for sure what you’re importing. If everything looks good, then click “Open”:
A confirmation dialog box will pop up telling you the script has been imported and given a machine-generated name. Click “Rename” to change the name to something that will be easy for you to find in an alphabetical list later:
Remember to give it an easy to remember name, but something unique as well:
Voila! You’re done. The script has been imported and saved under your chosen name. See the end of this post for instructions on how to load and use each of the scripts you’ve just imported.
Now that you’ve figured out how to get the code into ThinkOrSwim, it’s time to actually activate the code and start using it. Here’s a brief rundown of how to find and activate thinkScripts that you’ve recently imported into ThinkOrSwim…
If you were importing a chart study (or indicator), then you just need to go to charts > studies > edit studies, and search for the script name in the list. Then double-click to add it to the chart (or click “Add Selected” below), and then click OK to apply the changes:
Keep in mind if you didn’t give the study a name during the import process, it might be in the alphabetical list under “Fs” for “From Easycators on XYZ Date”, so be sure to check the “Fs” if you don’t see the study/indicator after searching.
If you were importing a strategy file, then you’ll still go to the Charts > Studies > Edit Studies window, but instead of searching in the normal list of studies, you’ll switch to the “Strategies” tab on the top left corner of the Edit Studies window, and then search in that list for the strategy file:
thinkorswim strategies
Again, keep in mind if you didn’t give it a name during the import process, it might be in the alphabetical list under “Fs” for “From Easycators on XYZ Date”, so be sure to check the “Fs” if you don’t see the strategy after searching.
If the link you just imported was a scan, a window will pop up with the scanner rules ready-to-go. Just click scan and watch it work. You might have to resize and expand the window to see the results. Or you can close that popup and load the scan in your main window as well. You can access your scans at any time from the dark gray menu on the top right:
Keep in mind if you didn’t give the Scan a name during the import process, it might be in the alphabetical list under “Fs” for “From Easycators on XYZ Date”, so be sure to check the “Fs” if you don’t see the scan after searching.
If you just imported a column thinkScript, there are a couple of ways to activate and use it. You can use columns in the MarketWatch Quotes tab, or in the StockHacker or OptionsHacker scan tabs, or on a sidebar watchlist on the left hand side of the window. In either case, you’ll first right-click anywhere on the column headers and select “Customize…”
A window pops open with a list of columns you can add. Just find the column name in the alphabetical list, and double-click to add it to the right hand side. Then click OK:
The column will now appear on your quote screen (whichever column header you had originally right-clicked on):
Keep in mind if you didn’t give the Column a name during the import process, it might be in the alphabetical list under “Fs” for “From Easycators on XYZ Date”, so be sure to check the “Fs” if you don’t see the column after searching.
That should just about do it. Now you should have all your scans, strategies, columns, and studies/indicators imported and installed. Not only that, but if you went through the second part of the tutorial, you should have the thinkScripts added to your screens and ready to roll.
If you find you’re still unsure of how to do something, check out my video. I walk through almost all of these methods on the screen for you, and it should help you figure out anything you missed:
If you have any questions or issues, please post a comment below!
Josiah is a stock & futures trader, ThinkScript programmer, Bitcoin maximalist, gold bug, real estate investor, and budding mountaineer. He's also rumored to be an in-shower opera singer. Josiah started Easycators in 2014 and lives with his family near Nashville, TN. xTwitter | YouTube
This website uses cookies to improve your experience. We'll assume you're okay with this, but you can opt-out if you wish. Accept | Read More
Privacy
Privacy Overview
This website uses cookies to improve your experience while you navigate through the website. Out of these, the cookies that are categorized as necessary are stored on your browser as they are essential for the working of basic functionalities of the website. We also use third-party cookies that help us analyze and understand how you use this website. These cookies will be stored in your browser only with your consent. You also have the option to opt-out of these cookies. But opting out of some of these cookies may affect your browsing experience.
Necessary cookies are absolutely essential for the website to function properly. This category only includes cookies that ensures basic functionalities and security features of the website. These cookies do not store any personal information.
Any cookies that may not be particularly necessary for the website to function and is used specifically to collect user personal data via analytics, ads, other embedded contents are termed as non-necessary cookies. It is mandatory to procure user consent prior to running these cookies on your website.